Friday, March 28, 2008

Happy Mail Day

When I arrived home from piano/violin lessons (not given simultaneously--I'm not that cheap), I was pleasantly surprised to see yet another packet of charms for my Seeds of Kindness quilt. Caryn sent the above selection of beautiful Thimbleberries prints. Looks like I have more cutting to do. Yippee!

I won't be posting tomorrow, so I'm going to show my Seeds of Kindness progress for this week. The bottom row is not attached to the quilt, but it is sewn together.

It continues to grow.

Till next time,

~Joan

Personalized Pyrex

Here is what I did this morning. Well, I did 2 dishes for a bridal shower first. While I had everything out, I personalized a dish for us. Like the sawtooth star block on the left?

My b-friend, Kairle, reignited my interest in doing these. Check out the right sidebar on her blog for a tutorial in etching glass. I had made some in the past. Tomorrow night I'm going to a bridal shower for a friend's soon-to-be DIL, so I thought these would be nice.

I etched another older Pyrex dish I have, but the etching barely took. You have to get right up there and squint to see it. My theory is that it doesn't work on dishes that have seen much use. The ones I did for the shower were right out of the plastic. They etched beautifully. The dish above is fairly new. I'm not sure if it gets tiny scratches sliding in and out of the oven, or if it's the washing that affects its etchability, but there you have it.

The one above is a 10" x 15" pan. If you buy pans to etch, examine the bottom of the pan to see how much writing is there. Your etching will not look good if it's competing with a lot of other printing.

Unfortunately, the set I got for the bride-to-be is Anchor Hocking. I got them (a set of 2, one 9 x 13 and one 8" square) because they came with serving baskets. I had to make the name much smaller than I would have liked to because they have so much writing on the bottom of the dishes. Consider yourself warned!

The hard part is cutting out the contact paper w/o slipping all over the pan with the exact-o knife. For the quilt block, I used a metal ruler to be my guide for the knife. Worked like a charm. Those straight lines are harder to do freehand than the curved ones, but the metal ruler makes it a piece of cake.

~Joan, eager to do some hand sewing later this afternoon

Thursday, March 27, 2008

Surprise Seeds of Kindness Packet

These beautiful bundles arrived in the mail today. On the left is a bunch (it looks like 25 or more) of the Subtle Solids. On the right are 5" charms from the new Lodge line from Thimbleberries. These are from an e-friend that has purchased many an item from me on eBay. She (Diane) just recently started reading my blog and asked about my Seeds of Kindness quilt. I have greatly enjoyed getting to know her. I think our husbands would miss us if we lived close together. Blogging has opened up a whole new world of e- and b-friends to me. The e-friends are those I met through email. B-friends are ones I met through blogging. Of course, b-friends become e-friends. While shopping for some note cards today, I saw some items I will need to get before my new b-friend, Lisa, visits from Hawaii (everyone has to live somewhere). Sorry the pictures are so small. Luke took them with his PDA camera card. This is as large as I could get them.

So, just let me know when you're coming, Lisa! Maybe I can even sew some of my azalea blooms into a lei for you. Just a few months ago I never would have thought of Lisa when I saw these:


We have napkins in a variety of colors at the top and shirt plates at the bottom (shirts for very small people, I might add).

Speaking of Seeds of Kindness, I have been delinquent in mailing fabric back to MOST of my contributors. I have been so busy that I thought I drove up behind myself on interstate 74 today. I have been nearly living in the car. I have not sewn one stitch today. I have plans though. I hope to get the thank yous & fabric into the mail at the beginning of next week.

~Joan


Wednesday, March 26, 2008

Purse Makeover Complete

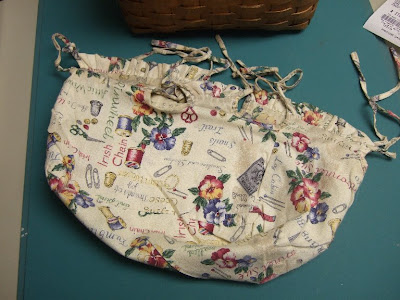
I have received so much inspiration and creative jump-starting through the blogs of others. That was one of the main reasons I wanted to blog myself. Above is my retired purse liner. Several asked about it. It took so long to make. I put a ruffle on it that hung down on the outside edge of the purse. I had to cut out openings (and make little ties for them) to go around the handles, hinges, and closure things. That took ages. I regretted to see it go because I really like the fabric. It has names of quilt blocks on it. The top edge was worn nearly through all 4 layers in some places, so it was time to replace it. Or so I thought.

Here's a picture of it in my purse. Ready for the makeover?

I realized that I could re-use most of the liner. I would make it a stand-up and not hang-over liner. How?? Very easily. I sliced off all of the liner below the ruffle and ties. Yick--it was grayed and worn from about 5 years of constant service. The problem was that the liner wouldn't stay up w/o help.

Cardboard to the rescue...I spied a box nearby, cut it to size, punched holes along the sides, and used twist ties to keep it together. I simply placed the cardboard between the two layers of liner and attached regular binding as if it were a quilt. Then I hand sewed a running stitch to hold the 2 layers of liner together so the cardboard wouldn't slip down (or the liner slip UP).

The finished product. Nice, huh? And it only took about an hour of work to revamp the old. Ahhh...I love it when a plan comes together. Ready for another 5 years of service!
Please be generous in sharing your tips and ideas. I love reading them.

~Joan


What I Found!!

As I was searching for a piece of sandpaper to re-stain and seal my purse, my eyes fell upon this long-lost item that my WH and 2 oldest sons had searched for for 90 minutes this past weekend (that's their story, and they're stickin' with it)... What in the world am I planning to do with an electric Stanley Sharpshooter, you may wonder? Well, the answer is clear. T is for terrific:
This little gem (above) came with our new dishwasher. It was wrapped around the outside (the top of the T) and the little part coming down was folded over the top. That was to keep it from getting scratched during transport, I think. Buy a $500 economy-sized ironing board pad and get a free dishwasher. LOL! Not really. But that's what it's about to become. It's a thick, yet compressed piece of what looks like 1-inch thick quilt batting.

I've been coveting other ladies' ironing stations. It's true. I know you never would have thought.

I have had several sightings of the board I wanted, but I wasn't willing to pay much for it. You know how you see something and file it away until everything comes together. That time has come. I saw Judy Martin's board, then Lisa's, then Taniwa's. I wanted to make better use of the space I had and get a larger board w/o the tapered end on a "regular" ironing board. Lots of storage underneath would be a plus, but very little expense must be involved. There was one other contributor to my great plan, but I can't remember who she is. She has a pic on her blog of a lovely pink-ticking covered board with drawers underneath, with directions on how she made her board.

Here is the way my ironing area was before. Ignore the drawers on the brick hearth (they were purchased after I moved the design board). My little design board was leaning there until a few days ago (when inspiration struck). Our former kitchen table you can see on the right side of the picture is the table where my children do the majority of their non-computer school work. Inevitably, someone would bump the ironing board as they went through and the iron would teeter, then fall off once in a while. That might be why the quilt angels took it home last week. At the far end of the room is my sewing machine and computer on the L-shaped table.

Maybe it was an unconscious desire to spare my new iron the same fate. Maybe I knew more storage would help this room. Maybe...


This picture shows the test run of the new plan. We never light the fireplace down here anyway. So it was a waste of space. I have a home business, hence the filing cabinet with the priority boxes on the right side of the hearth (with WH's shirt, patiently awaiting the iron). I didn't pretty the view up for you. This is real life.

For sake of the test, I merely folded up my regular ironing board and put it on top of the two new 3-drawer plastic dressers I purchased just for this spot. I had a light bulb moment as I was ironing last week. My I Spy stash drawers on the far left was only an inch or two shorter than my ironing board when it was on the floor. If I could get more of those drawers (I couldn't, but they had the wider ones same depth, yippee!), I could add storage and have a larger board.

My WH cut a board we already had in the garage into the shape you see lying against the hearth. The only thing between me and the completion of my plan was finding the electric staple gun. It was elusive for a while, but I cheerfully report its discovery yesterday.

Tune in again after I get it covered and in place. I figure if I need to iron a large quilt top and let it hang over the back, I can take my new big board to the laundry room and place it on top of my regular ironing board, where it will live henceforth. Another plus is that I can place my iron up on the wooden mantel that you see in the picture.

Purse update next.

~Joan

Tuesday, March 25, 2008

More Musings on Plan B

Just wanted to use an attention-getting color for a change.

As I was looking at my Plan B blocks from a couple posts ago, it occurred to me that I have not even made 50% of the dark background ones!! And I was getting all hung up about using the same units in a block. I can use one unit of a color combination per block and run out long before I finish the dark blocks. But it will be finished...some day.

This post is for those who think I whip out every quilt in a couple days (you know who you are!!). Much, MUCH more to do on this one!

~Joan

Spring Has Sprung in NC!!

A dark pink azalea about to burst into bloom... A pink geranium in a hanging basket (ditto on the bursting) and Dusty Miller plants...
My lovely yellow tulips, just opened yesterday (sigh)...
Creeping pink phlox...
I wish the pictures were better quality, but it was nearly sundown and the sun was shining brightly (not complaining, just commenting on the over bright pictures!).

I'll share my secret project tomorrow, I hope.

~Joan

Design Wall Input


Dear Quilters,

I'd like your input on what you like and don't like about your design wall. We're about to make some major changes in my sewing/school room. The design wall (48" x 60")formerly rested on the elevated fireplace hearth. It's a sheet of insulated foamboard artfully covered by a flannel-back tablecloth which is taped to the back of the board. I want something larger that won't hold the threads as much. I hope to have the whole wall that it's resting against in this picture for a design wall area in the near future. It is on top of a banquet-sized table and leaning against the wall.
The quilt blocks on the design wall now are eventually going to be 9 x 9 blocks. As you can see, I'm a little short on space.
These are my Plan B blocks. The little HSTs are not hard, just tedious. I think I still need enough for 20 blocks (that's 160 HSTs that finish at 1-1/2" square...no problem!).
See my next post for what's happening outside.
~Joan in NC

Another Weird Thing About Me...

...is that I'm 45 and have never habitually carried a purse. A few years ago my husband's company provided a cell phone for him. He got another for free or very little (I can't remember!) that I carried. I just put it in my pocket when I left the house. Well, it fell out a few times. WH suggested I carry a purse. WHAT?? I've never carried purses.


Here's my solution... This is a Henn Workshop basket (it looks a lot like a Longaberger). I made a liner out of fabric that has quilt names on it. Even put a pretty ruffle at the top that came out over the edge. But it has finally has met its demise. Some of the places on the top had worn holes through the fabric. The purse is in my husband's workshop in the pic. I sanded it down this AM and restained it. I would have been embarrassed to show it before. After it dries, I'll put a coat of matte polyurethane on it to seal it. I am going to make a liner again. I'm planning to cover cardboard with fabric and just set it down in the purse. I wouldn't go to the trouble of making one at all except that small things slip through the woven pieces on the sides. This has a handle that is behind that you can't see. The screwdriver stuck in the right side is keeping the top from sticking to the bottom as it dries.


While I'm glad enough to be finally giving my dear basket the makeover it deserves, the really exciting thing will be revealed in my next post. Here's a hint...it has something to do with a new ironing board.


Seek, and ye shall find!


Tune in at "Keeping You in Stitches" tomorrow. The excitement is so palpable that it can be sliced with a rotary cutter!!


~Joan

Monday, March 24, 2008

Eight Plan B Blocks

Remember the poll from a while back? It was about the above blocks. I decided to go with the original pattern design instead of these blocks. I don't know why I thought I needed to hurry to finish this. For what it's worth, your votes were exactly even for the new way and the original way.

Today I did laundry for 2 of my sons (translated sewing time). I stitched up a bunch of the HSTs needed for the dark blocks. I used my Easy Angle Ruler and cut the pieces from 2" strips. I got quite a few done. They finish at 2" square. Me, oh my!

I think the reason that I make so many quilts is just my compulsive personality. Marcie, you can stop laughing now.

I have a hard time *just* sitting. It about kills me. For example, tonight I had to go pick my son up at work. I thought he might be eating after he clocked out, so I grabbed my hand-sewing bag as I dashed out the door. I got almost a whole row of my Seeds of Kindness pieces hand-sewn together in the 15-20 minutes it took him to eat supper. We got to chat as well, which is always a blessing.

I do plan to show you my new ironing station (that makes it sound so special). It is a much better use of the space.
~Joan