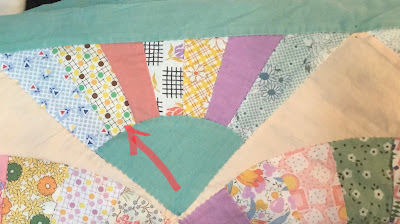
As many of you know, I have recently started renting a booth at an antique mall. One of my friends gave me a quilt that was given to her husband years ago. She thought I might want to repair, revive, and sell it. She hated it. It was falling apart. It was incredibly heavy. So she gave it to me and told me that if I didn’t want to repair it to throw it away. Are you picking up on the fact that she wasn’t attached to it? At first, I wasn’t either. But I’ve been spending some time with it. There are many characteristics of old quilts that I love. I love the way the fabric “acts”. I unstitched the crazy 1960/1970’s sheet that was used for backing and wrapped haphazardly around to the front for a binding of sorts. One can see how much the border fabric still showing has faded with age. Here is a picture with a line showing the part that was under the “binding” that is brighter than the rest. The heart is showing the holes where the yarn was removed.
Saturday, February 1, 2020
{Post 1,705} What I’m Loving Now
There was a super thick and compressed batting as well as a cotton blanket tied between this lovely quilt top and the hideous backing (sheet). Once I removed the ties, the top started to fall apart. I think the ties were holding some of the seams together.
Above is the only picture I have of it before I started working on it. It was tied with “safety orange” and white yarn. When I cut off all the ties, little holes remained in the fabric. I am hoping that most of them just go away when it is washed after I quilt it. I am pretty sure I am going to keep this. It will remind me of my dear friend who donated it, and I’m frankly becoming attached. I have repaired all the seams that just came unsewn. Now I am replacing fan blades that are shredded.
So many questions go through my mind when I am repairing an old quilt like this. How can one fan blade be completely shredded when the ones on both sides of it are like new?
Here are some blades I replaced with 1930’s reproduction fabric which I had purchased for making a new quilt. This first one was near the top border and was an odd shape. You can see in the second picture that I removed the tattered one to use for a pattern. Although most of the blade was gone, it fit perfectly.
Two were replaced next to each other here. The left one was shredded nearly down the center of the piece. I used the blue one on the right for my pattern for cutting all the new blades. Fabric tends to stick to fabric, so I just lay it on my new piece and trim around it.
The heart shape is around where I inserted the two new pieces. They match the other fabrics well, huh? I think so.
I love piddling around and doing this meticulous work. For some reason, it never seems like a chore. It is like restoring an old friend.
In this next picture, I am showing how I closely pin the seams that just had a break in the hand stitching and came apart. One of the other things that fascinate me about this fabric is how it can be so strong and yet be so soft. It barely ravels at all, even when these seams have been broken for quite a while.
Now that all the straight seams and curved seams have been repaired, I am going block by block to see if each fan blade is maintaining its integrity. If one looks weak or has a hole, I am replacing it.
I won’t be sewing much for the next few days at home. I am leaving Wednesday AM to head to Ohio then Pennsylvania. I will visit my parents and sister in Ohio for a couple days, then spend a couple weeks with my daughter and her family in PA. I need to prepare projects for the time I’m there.
I am taking my Featherweight to sew some new things for my booth. I want to make bag holders for grocery bag storage (I don’t know how people live without one or more of these), bowl cozies (my main item for now), and a baby quilt I will need for a baby shower on March 1. I have the backing fabric for the baby quilt, so I need to pull colors from that for the front. I will likely piece that first, then work on the other items as I have time. My girl wants me to help her paint their huge bedroom, bathroom, and closet while I’m there. I usually go to bed way after and get up way before them, so I plan to take things to keep my little fingers busy.
Friday, January 31, 2020
{Post 1,704} Color Red Runs
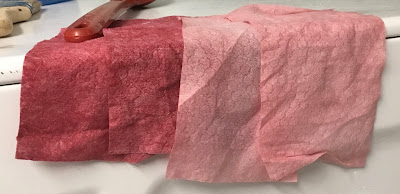
I have bought a number of quilt tops to quilt, bind, and sell. There was a heart top that I thought would be perfect in my booth for Valentine’s Day. Someone saw it (unquilted) at my house, and she offered to buy it once I had it quilted and bound. Well, I decided to wash it for her as well. Better me than her. The reds ran. Here are the color catcher sheets after the first and second loads. When I saw them red as crimson after the first wash, I immediately threw in two more sheets, removed the first ones, and washed it again. It was STILL pink when I pulled it out the second time.
I could not figure out why the dye had run with a 1/4” frame around the heart. I looked up (on Pinterest, of course) how to get the dye out. I filled our bathtub with hot water, boiled some pots of water, and added Dawn dish detergent and donned thick rubber gloves. I swished my quilt through it, and a lot more dye came out, making the water pink.
It was rare, but it had snowed here unexpectedly this AM. At the time of the quilt anxiety, it was far from AM. Plus, we were having guests for supper, and I had to make dessert and supper yet. But my quilt needed me. My husband was reluctant to have me go out because it appeared that the roads were bad.
I called a local store to see if they carried a product called Carbona Color Run Remover. They did. I bought two boxes and went directly to the laundromat with my still-wet quilt. I ran it through their washer (which is much more aggressive then mine and uses quite a bit more water). When it came out, still wet, I noticed that the “bleed” pattern matched the fabric of the heart pattern right above it. Then it dawned on me...the person who pieced it did not cut off the extra red when she did the flipped-corner technique. Because it was wet, the red showed through the thinner white fabric used as a background. Oh, me! I was so upset previously. So I threw caution to the wind and just dried it in our dryer at home.
Here are some pictures of before and after. I think I still see some pink, but hopefully it is just in my memory.
What do you think? Do you see pink in the bottom picture, where the quilt is completely dry?
Subscribe to:
Comments (Atom)


