Showing posts sorted by relevance for query selvage. Sort by date Show all posts

Friday, November 18, 2011

{Post #850} More Selvage Loveliness

I really AM clearing off my cutting table.  But I'm sewing up the scraps and goodies as I go!  I found these cute potholders online, so I made up 6, 4 on the diagonal...

From the online source:


Mine (not quilted or bound yet, obviously):


I cut a "base fabric" (this is read yucky stuff I had a chunk of on my cutting table) into 6" squares and just made sure they were covered, then trimmed them down after sewing the selvages on.  This time I did not take the time to switch thread out every time...I just kept a dark wheat color in and let the stitches fall where they may.

Here is my next cutting-table-clearing project.  I used 10-1/2" square base fabric (the red).  Then I marked a dot 1-1/2" from the same corner and 5" from each side of the opposite corner.  I used a gray pencil to connect the dots from each 1-1/2" mark to a 5" mark on an adjacent side.  Then I drew a line 1/2" in from where the 5" mark side was to create sort of a triangle.  Then I just took a piece big enough to go from one side to the other and started adding selvages. 

I'm sure this is like any other sewing project...everyone has their own way of doing it.  I line up the selvage side of the fabric with a pencil line and sew as close to the edge as I can.  I do two blocks at a time so I can have a leader/ender thing going.  The next fabric is placed facing the same way so that the selvage is on the same side as the first one.  I overlap the previous raw edge only as much as I have to and then stitch closely to the selvage edge again. 

Here is one block that is 10-1/2" square.  Same sewing as the potholders...make sure some is hanging over and then trim to original size when finished.


Even though what I make is nearly always scrappy, I usually have some unwritten rules.  They are written in this case!  I didn't use a red strip for my first one since the center of the block is a red print.  I broke my own rule by using some very small pieces for the last print that don't have words on the selvages.  I repeated a fabric in a block a couple times, but once they are sewn to each other, it will be so busy that it won't matter.

After I got to where I didn't have enough selvages to start another 2 blocks, I moved something on my table and found 3 very long selvages.  After I do some baking for Rachel this evening (and clean up), I am going to do a couple more if I have the energy.  Wish me luck!

Here are all 8 I did this afternoon...each block finishes at 10" square.


Here is where I sort of got my inspiration (from an online picture):


I used a Thimbleberries red, so of course I am not in danger of burning my retinas out.  Isn't that cool?  Instructions for the Red Zinger are here along with lots of other patterns.

~Joan

Thursday, February 9, 2012

{Post #902} Red Zinger


Here is the Red Zinger as of this AM.  The reason I picked 10-1/2" foundation blocks is so I could cut the selvage off the red and end up with no waste.  I put the selvage in my selvage box then cut 4 ten and a half inch squares and pitch the tiny sliver left.  


Right now I don't have many varieties of selvages.  I am going to cut some off my I Spy stack and make the last two blocks to finish this set out.  Trying to decide how many blocks I want total as well as what I'll do for a border.  Have a couple ideas floating around up there. 


This measures 60" x 40"  I will make the center at least 60" square, then add borders.


I have these left over from my Texas Braid and just might find a way to use them for a border.  They are not the same red, but variety is the spice of life, eh?


Something to mull over.


In very exciting news...someone emailed me about buying my Little Gracie frame.  My new HQ one should be here by Monday, so no time like the present to get this one out!!


~Joan

Thursday, March 8, 2012

{Post #927} Red Zinger


Here is the progress on my Red Zinger as of this moment.  I also have the bottom selvage border pieced, measured, cut, and ready to sew on.  I would have sewn it on already, but duty calls.


Here is my favorite fabric in the top selvage border...the monkey in the middle.  So cute. 


I'll tell ya...making a selvage quilt is like making a library of your fabrics.  A tiny piece of them all!  Well, at least the ones you've taken the time to cut the selvages off of :)


TTFN, Joan

Monday, October 15, 2012

{Post 1,070} Spiderweb String Selvage Blocks


It's been over a week since I posted!  So much has been happening.

Quiltwise, I started a new project.  It's a spiderweb block made from selvages and is a string project.  Natasha--see any of your fabrics???  I do!

Here is a close-up of a finished "web" with the blocks just stuck to the wall, not sewn together yet:


I am going for a diagonal rainbow color look...red, orange, yellow, green blue, violet, then reverse back out to a red in the bottom corner.

Here's what I have pieced so far.  The selvage strips really multiply and go much farther than one thinks:


More updates later as time permits.

~Joan


Monday, February 1, 2016

{Post 1,513} Maverick Stars Framed


Above are 4 of my Maverick Star blocks, with their frames.  I am trying to reduce scraps here, ladies!!  My center blocks are 5-1/2" square.  I am surrounding them with strips from my 1-1/2" strip bin in scrappy darks or lights.  For the outermost border, I am cutting one width of fabric, selvage to selvage.  I can get two 7-1/2", two 11-1/2", and two 2-1/2" squares (which is the size of the centers and corners of the Maverick Stars) with just a sliver of waste.  Voila!!

That makes these blocks 11-1/2" square.  I like the rest the same-fabric outer borders gives the eyes.

Monday, May 4, 2015

{Post 1,476} Sew Many Posts in a Row!


Is this truly my third post in 3 days?  Maybe I'm back!!

Here is a quilt top I'm machine quilting to give as a gift to a friend who is going to visit on Friday from Colorado.  I haven't seen her for a couple years.  She's the kind of friend that I just continue a conversation with as if I'd seen her yesterday.


This is my Red Zinger selvage top.  Click on the link to see all posts about the Red Zinger.

I came up with a unique design to quilt in the red X's.  The same shape appears in all 4 "arms" and they connect in the middle of the X.  I used red thread on red fabric, so I have a flashlight shining on it to get a good picture.  Hope you can see it!


I like the quilting I've done so far.  I used cream thread first and went through and stipple quilted all the selvage blocks, with a big feather in the border selvages.  Now I'm going back and doing the above design in all the arms plus a back and forth kinda squared off chain in the inner border in red.  I'm pleased with it.  Will show a pic of the whole thing when I finish, which I hope will be tomorrow.

Wednesday, March 7, 2012

{Post #926} Red Zinger


Below are the 36 blocks of my beloved Red Zinger quilt.  I admit it...I love selvage projects.  Having Sam and Pam here pushed me to finish the center of this.  I finished all the blocks this AM and have one 30" section of selvage piano key border finished for the outermost border.  


Yesterday I took out my stack of I spy fabrics to cut some squares and shave off all THOSE selvages.  So now my collection is big again, and bright as well.


Monday, March 27, 2017

{Post 1,527} Selvage Blocks

I started making these selvage and eggplant purple blocks a couple months ago.  I finally finished them all.  Here is my quilt with the top 5 rows sewn together and the rest webbed. After this is pieced, there will be one more row of pieced blocks all around the outside and then a border of the purple. Each block finishes at 5".


Wednesday, December 28, 2011

{Post #867} Feels Like Fall

That is the name of the new block I'm working on as a leader/ender with the goslings.  Here is the first block...


I am going to start on one of the alternate blocks.  The blocks are 10-1/2" square.  The alternate blocks are one big pumpkin.  I'll probably have a picture up by tomorrow some time.

In other progress, I finished another complete row of an I Spy quilt I'm starting for way down the road, so I got that off the design wall.  I also took down my Red Zinger selvage blocks and stacked them in a drawer.  The design wall is practically empty.

~Joan

Wednesday, February 8, 2012

{Post #901} Red Zinger and Youngest Son


Last night I wondered what I could sew when I got my next opportunity.  I stitched this earbud holder for myself:


This AM I was hampered by a gnarly cut right at the corner of my thumb nail of my right hand.  It is deep...looks like the skin just cracked because it's so dry outside.  Anyway...I didn't exercise this AM because touching it makes me want to scream.  So I cut out some background blocks for the Red Zinger and sewed 4 more.  


I used some newer non-Thimbleberries fabrics, so I will need to spread the bright colors out a bit.  Some were from I Spy prints and others from Christmas ornaments I put together or my kids for this year.  One strip was from the owl fabric in the above picture.  


This is so fun to sew...very little brain power needed and it's like using up strings, but no need to turn the raw edge under.  Each block finishes at 10". 


Here are pics including my new blocks and a close-up showing the owl print selvage:


That sky/light blue really stands out, doesn't it?  Will definitely need to keep an eye on the placement of those blocks.


My youngest...just time to update a picture of the little nipper:


Ta ta for now...


~Joan

Thursday, February 21, 2013

{Post 1,121} Scrappy Selvage String Spiderweb Top Finished


Pushed through yesterday afternoon to get both the outer borders on this quilt.  I already have a quilting pattern in my brain, so I might get started on quilting this soon.  It is about 80" square.

Here is an all-over shot and 2 close-ups:


My plan here was to 1.  use selvages.  2.  use up a bunch of the bright blue fabric (which the back will be made from as well).  3.  make a rainbow theme (please tell me you noticed the stars are red, orange, yellow, green, blue, violet diagonally).

Now to quilt and deliver.


Monday, July 4, 2011

Crumb Quilt Top Finished


This quilt top is so big.  77" wide by 94" long.  I didn't take the time to make sure it was lying completely flat.  That is not a pucker in the bottom blue border, just laziness on my part.  I didn't want to retake the picture.

I am eager to get it quilted.  I added all the borders today.  Since I had pieced the flying geese strips last week in Ohio, it was relatively easy to cut the blue borders and add them.  The outer border is 4-1/2".  Looking at it now, it was so worth taking the time to piece all the geese.  It makes the quilt look so finished and framed.  Thanks for the great pattern, Natasha!!

Instead of cutting and piecing strips cut perpendicular to the selvage, I cut a 94" wide piece of fabric, then cut single-piece strips from it.  I will also use it for binding, so I will have a piece about 8" x 94" left over.  That will be the beginning of my backing.  At some point I will count the pieces in the quilt top.  Any guesses??

What is surprising is that except for the cream and the blue for borders, this was all truly scrap...mostly pulled from my little stacked drawers.  Won't even miss it!

I used Bonnie's instructions for measuring for floater strips here, and they turned out perfectly.  My top and bottom inner borders were cut 2-1/8" wide...the side ones were cut 1-7/8".   The geese borders went on perfectly, too.  I made 4 crumb blocks for the "cornerstones" instead of piecing a little something. 

Perhaps the back will use up lots of large small pieces, too.  Stay tuned!

Enjoy the celebration of our Independence Day.  I am more thankful for March 26--my personal Independence Day.  That is the day I trusted Christ as my Saviour and gained independence from the hold of sin and the responsibility for its penalty.  Praise God, from Whom all blessings flow.

~Joan

Monday, November 21, 2011

{Post #851} Potholder Top


I wanted to bind this little potholder for my daughter, Emily.  Some of us are driving down to see her on Friday.  This is my only selvage project that has "Superman" fabric in it.  See the emblem just above the center of the potholder?  Her husband was nicknamed Superman when a little kid saw him on a cherry-picker truck or up on scaffolding or something like that.  I used the insulated fabric shown (made for potholders/oven mitts, etc.) to make it heat-proof and backed it with fabric that will match her kitchen.  Won't show it all because it's supposed to be a surprise.  I doubt she reads this.

Finished hand-quilting my Seeds of Kindness quilt today.  What I thought would be a "Big Deal" moment is more of a "Big Whoop" moment.  Very anticlimatic.  It's in the washer now.  It is a special quilt, but probably only to me. 

~Joan

Monday, April 25, 2022

{Post 1,762} Juicy Fruit Quilt

We went to south GA this past weekend. We haven’t seen my oldest son’s family in about a year. I drove all the way down, and my husband drove all the way home. It was about 8 hours in the van one way. As usual, I gave much thought to what I should spend my time on while he drove. It was going to be daylight the whole time, which makes a difference. 


I never travel w/o my iPad. Between Kindle, email, blogs, etc., I can keep happily busy for hours. But I never pulled it out once. 

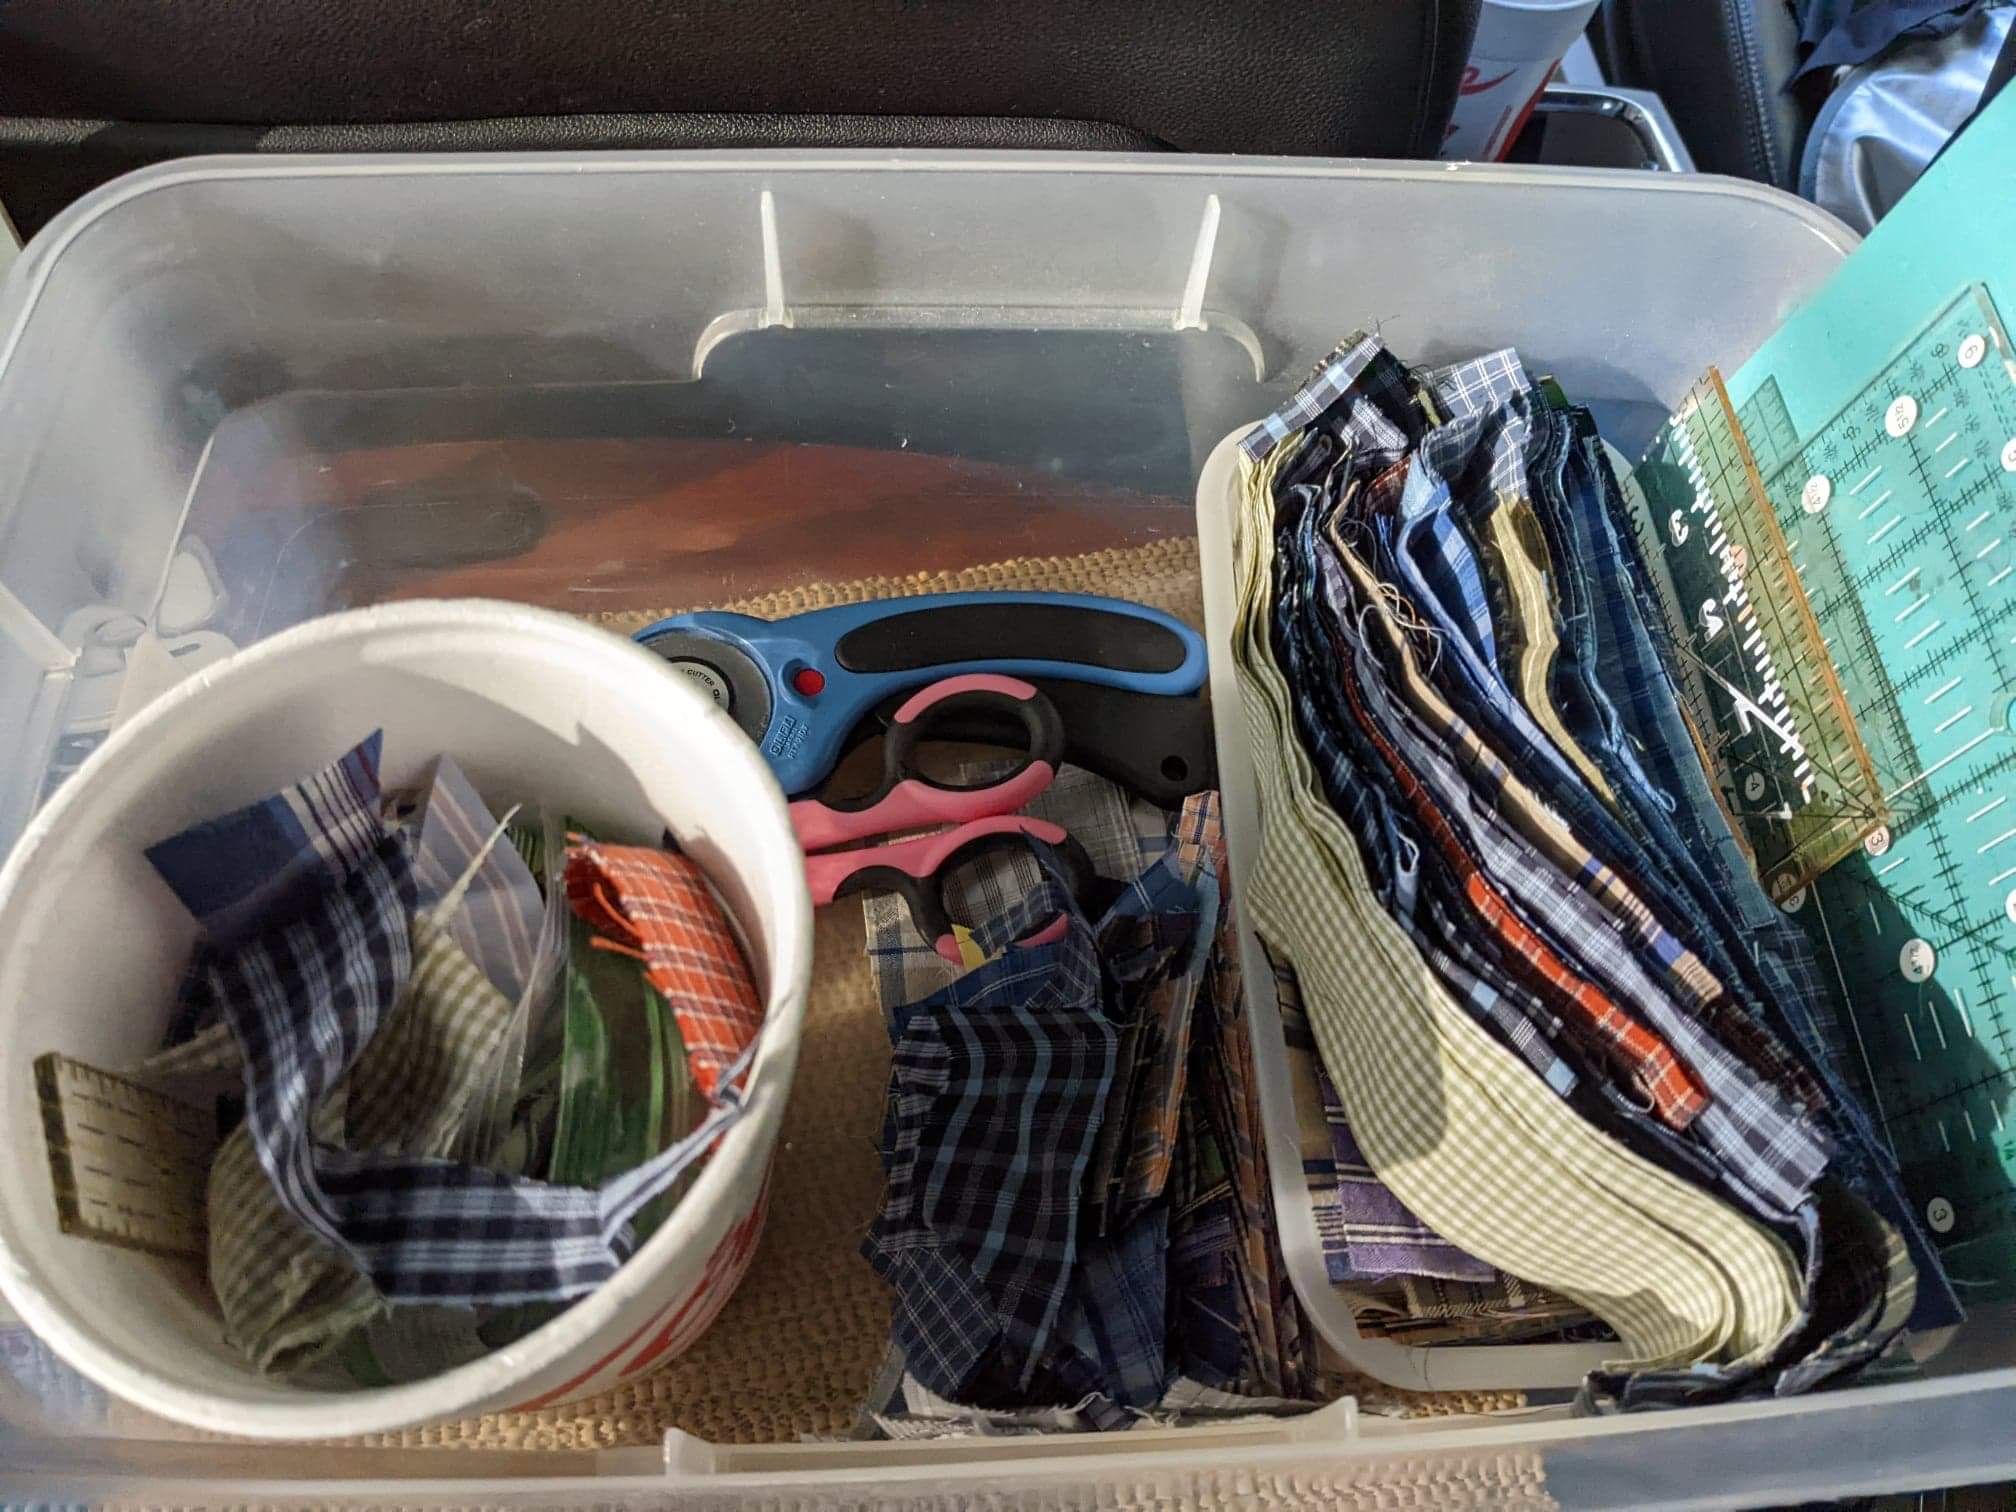
This box of shirt scraps was accumulated when I last cleaned off my cutting table. I am blessed to have a big pressing station as well as a big cutting station in my sewing room. I found bits and bobbles of shirts all over my sewing desk as well as the other two flat surfaces. I kept throwing them into a plastic tote box.

Often I get questions about how I get so much sewing done. Well, I sew every day (just about). Having pieces precut is something that I don’t do often. In this case, I was cutting down the shirt leftovers for two different quilts. They are both blocks I made up and both are pieced onto old phone book pages. That is for stability and to make sure they get up to the size I am shooting for. 

The first one is named Shirts and Selvages. I save selvages from all my fabrics. I have made many different items from them. I am using cash register tape (I got 4 rolls for $1 at a local thrift shop) to piece selvage strips, then I trim it down to 2-1/2” wide. I put that diagonally on a 6-1/2” square paper and use strips of shirts to finish the block out. I got this idea from Bonnie Hunter originally. If you’re new to upcycling shirts or string piecing, check out her blog. It’s quiltville.blogspot.com. I cut strips as small as 1” wide. Nothing over 1-3/4” on these small blocks. Here are my first ten. I use up a strip until it’s all gone. As I finish the blocks, I will spread out the heavily-repeated fabric.


 The second quilt I am calling Juicy Fruit, after the stick gum sold when I was a child. I don’t know if it is still sold. The block shape is gum-like, and the colors made me think of the multi-colored zebra in the commercials. I cut paper and muslin 3” x 6”. The paper is covered with shirt strips. The finished blocks are alternated with the muslin.

Here is where I am so far with that one as of a few minutes ago. This will measure 49.5” wide and 45.5” high when the blocks are sewn together. I have them sewn into groups of 18, 3 across and 6 down. That way I can move them around to distribute the eye-catching colors before sewing the final layout.


Each new quilt is my favorite, and when I’m sewing two at once—that’s a lotta love!

So my cutting strategy? I pulled out one piece (I figured it didn’t matter which one since I was going to try to cut up the whole box…and I did). If I could get a 3-1/4” long piece out of it that was at least 1” wide, I’d cut some rectangles for the Juicy Fruit. I stacked them all so that they weren’t in a jumble when I went to sew. If the piece was fairly large, I cut a 3-1/4” wide strip then subcut it into various widths for Juicy Fruit and cut the rest into strips for the sides of Shirts and Selvages. If the piece was too small, but big enough to matter, I matched it with a similar width piece to piece later. I laid those in my husband’s baseball hat which was beside me in the van. When we got home, after I put things to rights, I pieced and trimmed all those. I. Could. Not. Wait. You can see the pieced ones in the picture above. I also had those pieces at the very top of the shoulder seams of the yoke that have the diagonal edge. Two of those fit perfectly together. Waste not, want not! That’s pretty much my theme for everything. Here is a picture showing the difference. The top went into the very neat strings pile, and the bottom went into the trash. Even I have my limits.


So, do you like one quilt more than the other? I’d love to hear what you think about them. Using upcycled shirts makes the quilt seem loved and antique from the start. They are more lightweight than using quilting cottons well. I simply love them.

I bought an old wooden lap desk years ago at a thrift store in town. We always take it on trips because my husband usually works if it’s a weekday (while I drive). I use it if it’s a weekend. My iPad, practice sheets for machine quilting, and other items work fabulously on it. I sat behind my husband in our van on the way home.That way I could spread out my things beside me (our second row of seats fold into the floor, so we folded the other one down).

Here are a few pictures of my trip home. Not only did I get all the fabric cut, but I also cut up all the selvages I took with me. I stored those in a plastic bag so they wouldn’t get mixed up with the shirt scraps. I am messy, but neat. LOL!!


Years ago I cut up a badly-scarred cutting mat, and I take one of those to portable sewing opportunities. 


This is the box I started with…the styrofoam cup was from lunch. I used it for a trash can. Only the tiniest bits didn’t make the cut, so to speak!


This is what I ended up with…the rectangular leftover container was laden with neatly stacked strips, and I had row upon row of pieces for the Juicy Fruit quilt. The cup held just a smidgen of trash. 


Back to sewing for a bit! 


Sunday, June 5, 2022

{Post 1,763} Vintage Pansy Quilt

 I have many friends at my daughter’s in PA. She lives over 300 miles from us. One of those dear ladies recently asked me if I would quilt an appliquéd pansy quilt top she made 40 years ago. So, on our last visit to PA (two weeks ago), I picked it up. 

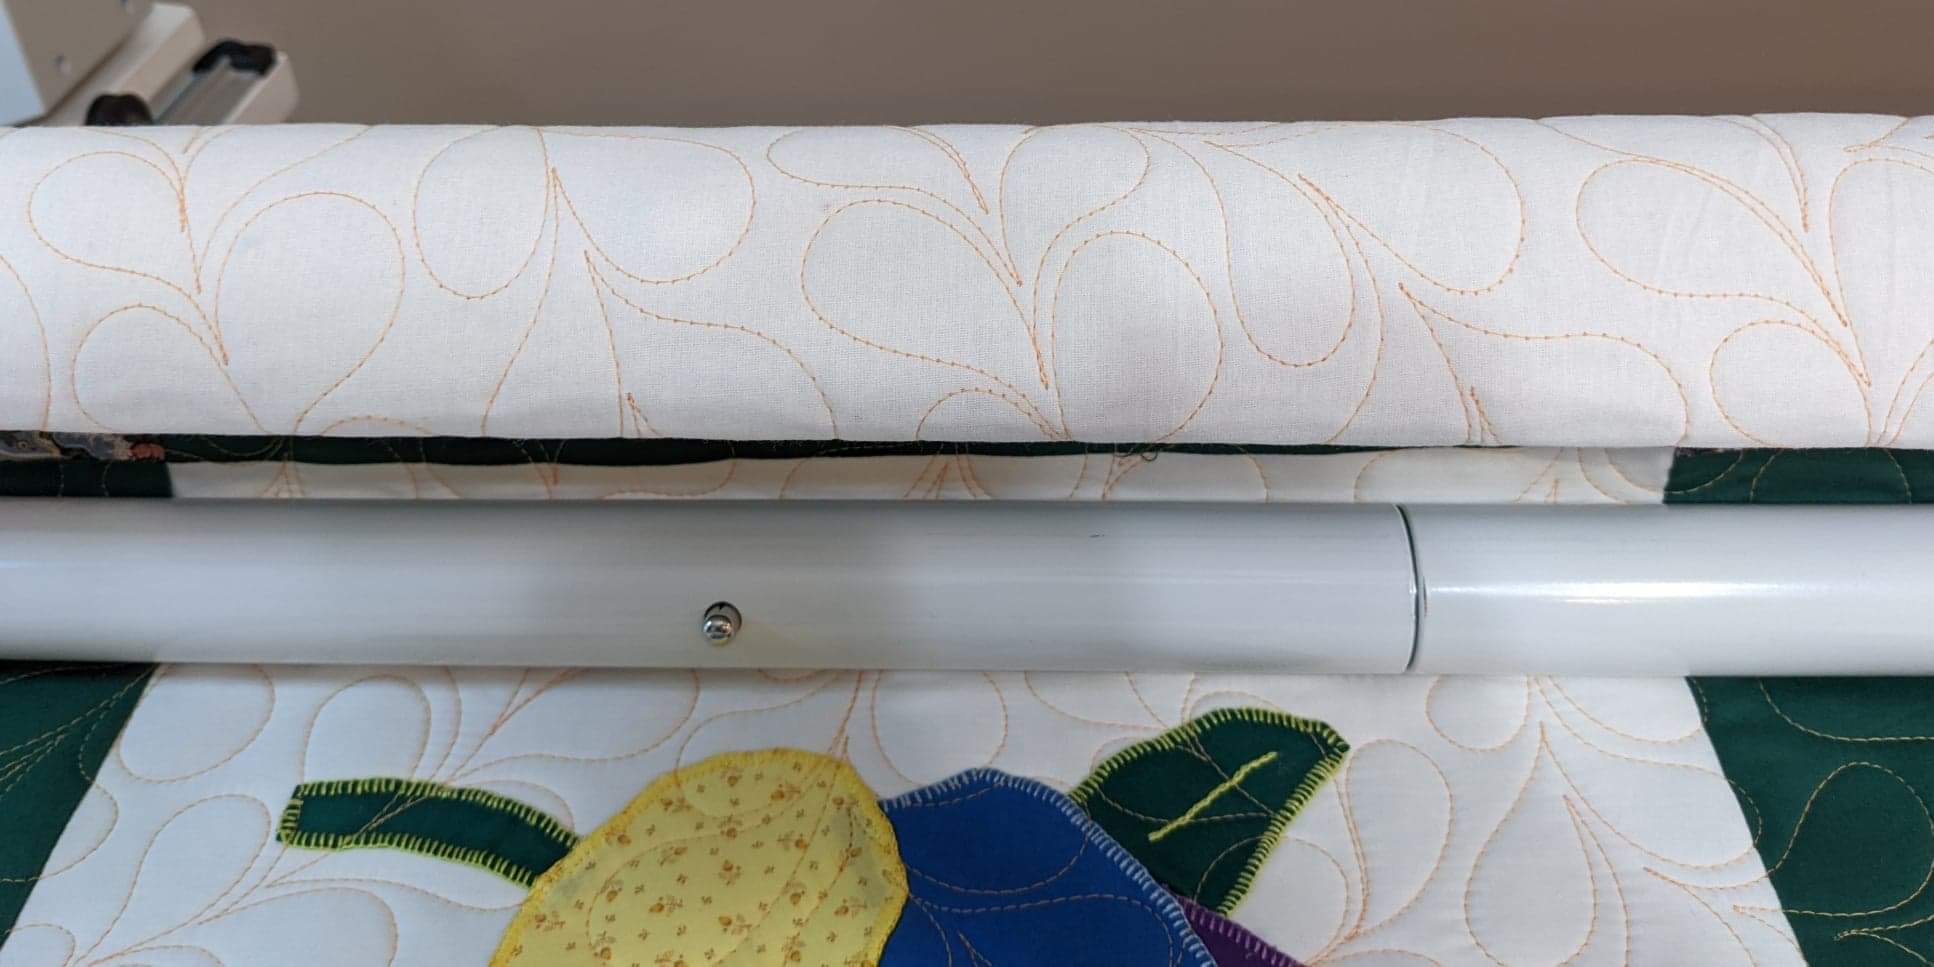
Susan Smith of Stitched by Susan has a freehand masterclass that I finished earlier this year. I used so many “new” skills when I quilted this top. It had extra fabric all over the borders, which is rather common. I felt armed with better skills to tackle this and make it as beautiful and flat as I could. Here is a pic of before and after of the same corner. I used a peach-colored thread and an all-over feather pattern to pull in the fullness.


I was soooo thrilled with how flat and pucker/pleat-free it turned out.  Here are some pictures of the top in progress and some of the completely quilted quilt. The backing is white muslin.


This next top is one I’ve been working on for years. No rush as I don’t have someone in mind to give it to. I am trying to sell it. I will quilt it if the new owner wants. It is called Bear Mountain Cabin by Glad Creations Quilts. I love their patterns. 


Here is another quilt in the works. I just need 22 or so more blocks completed to reach 60” x 72” in size. This may have a border…I have not decided yet. It is made with a strip of selvage down the center and men’s upcycled shirts for the balance.


Wednesday, October 3, 2012

{Post 1,063} Ornaments Finished


I finished the first batch of the selvage Christmas tree ornaments.  Now I'm wondering what to do with them!  I would like to sell some to support my habit (of quilting, that is).

Here are six of them:


As I was sewing the jute loops to the top with buttons, I was having trouble finding buttons small enough to use in my button box.  Then *aha* I remembered my small jar of buttons that I'd removed from the men's shirts I was using for quilts.  Perfect!

Making fantastic progress on my 3 identical secret Christmas projects.  Head on over to my secret blog to check them out.  If you need the URL, just email me.

~Joan


Friday, June 15, 2012

{Post #989} Quilting Coming Along

It is so hard to get a good picture of quilting.  I admire those who do it often with good results.  This AM I started machine quilting my scrappy bargello quilt.  I finished the center with a variegated dark tan thread.  I did a dwirl and twirl pattern.  The dwirling on Pajama Quilter is neat, but I added about half of the surface covered with "twirls".  See if you can see it in these pictures...


The second picture has a row of HST selvage blocks to stretch the back!  I needed about 3-1/2 more inches.

The following picture shows the pebbles I'm quilting in the 5" wide border.  Those take a lot of thread and a lot of time!!  I'm doing them on my domestic sewing machine.  I might try them some time on my Handi Quilter.  I have nearly two borders finished.  That's over 2 bobbins of thread.


~Joan


Wednesday, May 14, 2014

{Post 1,353} Three Runners for Susie

I am going to a post-wedding shower on Saturday for my newly-married daughter, Susie.  She requested two runners (the first and last), and I added the one in the middle. 

This first one is a new technique for me...curved seams.  I made the center panel one WOF and covered it with selvages.  Then I followed the instructions on Red Pepper Quilts blog for curved seams.  I made the curves gentle to see if it would work for me.  It did.  I even did the quilting a little outside of my comfort zone.  It measures 12" x 42".

I think I used 6" wide for the selvage and white layers and 9" for the black, then trimmed it to be 12" x 42".  That is for Ruth.


This one measures 18" x 23".  I think the colors look like camouflage.  Fitting for her, I think.


This one measures 16" square, and is loosely based on a baby quilt I pinned.  


Sunday, March 3, 2013

{Post 1,124} Scrappy String Selvage Spiderweb Quilted


Today this entire quilt has been quilted.  I did a simple design so it would not be so stiff (the selvages make it stiffer than usual anyway).  I did a Fern Ziggle (Pajama Quilter design) on the center, reverse curlicues on the gold inner border, and what I call a hook feather on the outside border.

I did the center and inner border with a variegated pastel thread.  After that was finished, I realized I didn't have any thread that matched the outer border.  I didn't really want to wait until the sewing shop opened tomorrow because I had time to sew TODAY.  I looked through my machine quilting threads again, and came across one that sorta matched, but it looked way too gray.  It was from a box my friend Sam sent me a long time ago.  She was getting rid of threads she didn't like and sent me a box.  Thanks, Sam!  After quilting, this one really filled the bill!  it matched so well that I had a hard time seeing it as I quilted.

I'm so grateful for the GOOD things the internet provides.  I have made many new friends through it.  I used a design that I saw just a few days ago on my friend's blog.  The pattern was easy to figure out and went so quickly.  

There was also time to sew on the binding to the front.  I am going to start sewing it to the back tonight.  My daughter's baby was due 2/28 but has not been born yet.  This will keep me busy until we get the word that she is in labor and we start the 8-9 hour drive to go see our grandson!

These are the best pictures I could get until it's washed and dried.