Thursday, January 26, 2012

{Post #891} GFG Repaired and Enlarged


One thing I've come to realize when I'm making a craft:  As soon as I realize I don't like something, take the time to undo it, and then go on.  


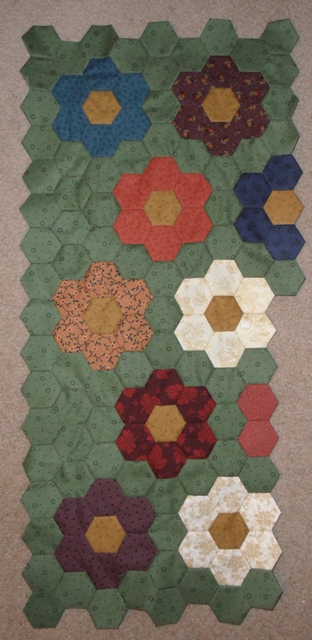
For example, it really bothered me that I ignored my color plan and ended up with the two cream flowers side by side.  Some people would say, "Oh well--who's going to notice?"  *I* am going to notice...it's MY quilt!  So, yeah, I ripped out the cream flower and put the one that was supposed to be there. Not sure I like the periwinkle flower because it stands out so much.  I hope once the garden is complete it will look like it fits there.


This piece measures 28" from top to bottom.


Here is the before and the now (after)...


So, all in all, I'm back where I started, and even a little ahead.  I have the cream blossom pieced to just stick in where it belongs when I get there.

~Joan

{Post #890} GFG


So here is my Grandmother's Flower Garden progress.  I cannot take the mistake I made of ignoring my color layout and placing two cream flowers next to each other (I mean--what in the world?), so I will be removing the bottom one and replacing it with the flower that I originally planned to be there.


We are replanting the flower bed areas outside the front edge of our house...hopefully this year!  I am eager to plant lots of lovely blossoms out there.  White and orange and red and purple...just like my GFG...but I am not a grandmother...YET!  I am not dropping any hints or news--just making an observation.


~Joan

Tuesday, January 24, 2012

{Post #889} You Won't Believe It


An unprecedented event took place here at Parker Ranchero this AM.  I cleaned off my cutting table.  Yes, it's true.  I remembered right before I jumped in that I should take a "before" picture.  Here it is...


Whew--it looked overwhelming.  The reason I started this arduous process is that I lost the instructions for my secret project AGAIN!!  I figured it could not hurt to clean up this mess.  I couldn't even cut any more fabric.  It was time for intervention.  I hope to finish the blocks today and needed to know how to cut the pieced border!!  Hop on over to my secret projects blog to see the progress on my latest endeavor.


After about 30 minutes this was the result:


The second picture is to prove that I didn't just dump everything on the floor.


I found the instructions.  They weren't on the cutting table, but that's OK.  I found them.  I also found my magnetic wrist pincushion that I use when I pin a quilt to my machine quilting frame.  It's been missing for a really long time.  Having it makes pinning so much easier.  Um, it wasn't on the cutting table either.  


Both of the items were found when I was putting away things from the cutting table.  It pays to be thorough.


But I am still glad I cleaned it off!!


~Joan


Monday, January 23, 2012

{Post #888} New Flag Sign


Had a good, but very travel-filled day.  I found a new "used" piano at a Habitat for Humanity ReStore for my girls.  After I bargained down the price, I see a sign behind the register that said something like, "We begged for it, hauled it, cleaned it, stored it...now tell us again why we should take a lower price.  Don't even ask."  Well, in all honesty, if I'd seen the sign before I asked for a lower price...


While I was waiting for the piano to be rung up, I did a quick run through the store.  I had just been there a couple days before.  I saw this sign (which had not been there before), and it had potential.  I found it amusing that they had hung it with the wrong side against the wall--probably because it was so faded.  It was nearly the same style as one I saw and had planned to make myself one from "scratch".  I did not like the white stars painted on the blue.  One was obscured by a fleck of paint that chipped off on the top left one anyway.


When I got home, I pulled out these (the blue M & M cup was just there to give moral support)...


And started doing this (two reds stripes and blue painted)...


Then I did this (all but one white stripe painted)...


Finished except for one more tiny thing...speckling:


This is an easy way to "antique" a newly-painted item.  Just thin down white, brown, or black paint with water.  Protect the surrounding area with paper (I just tape a plastic garbage bag to the back of the backsplash and go at it in the kitchen.  After the paint dries, you can use the bag as intended.).  Use a very stiff brush (an old toothbrush works great).  Do some test speckles on a piece of paper, then go at it!


Finally, the finished FINISHED product:


Just to show how human and mistake-laden I am, here was my first speckling attempt:


See how the brown speckles on the cream are bloppy and fat?  I panicked momentarily, then tried in a nanosecond to convince myself that it was OK, then I grabbed a damp counter-wiping towel and wiped them off.  They all came off.  Then I (not) patiently waited for it to dry.  I added another drop of brown paint to my mix and did it again.  I am glad I did.


I toyed with the idea of painting "God Bless America" or "In God We Trust" on it, but I am leaving it as is now.


Why was I going to make something like this in the first place?  I want to make one of these for this summer to keep outside during the spring/summer months, and this is the perfect accent:


In time, little grasshopper.  The funny thing is that I have the EXACT same ceramic flower pot.  Meant to be, eh?


So, to sum up, I went from this to this:


I want you to know that you can do this, too.  It only took about 30 minutes of painting and a 25 cent sign!


~Joan


{Post #887} Emily and Steve's New Quilt


Here is a picture Emily posted on her blog that I stole.  It is the quilt I made Steve 'n Emily for Christmas.  It matches their room so well!


This is the one that was on my secret projects blog while in the making.  Glad they like it!  On that blog I called it the B & B quilt.  That stands for blue and brown or bread and breakfast, depending on whether I'm at their house or not :)


~Joan

{Post #886} Help Find Pattern


I need help finding a pattern for this quilt I saw on someone's blog.  It is called Irish Stars.  I cannot find a pattern for it.  I even looked at the company's site where supposedly the kit was purchased.  Alas--it's not there.  Can anyone help me find the written pattern?


It is from this blog


I made up one block to see if I could come up with measurements.  This is going on my list of quilts to make, but it sure would be easier if I had a pattern!!


If and when I make this into a quilt, I'll use one blue and one gold for the stars.  This is a busy, busy pattern.


I am putting all my piecing time towards finishing a big bed quilt that is a gift.  If you have access to my secret blog, you know which one I am talking about.


In other news...Dad--your shower curtain is finished except for the buttonholes, which I will try to do today!  Hope you are enjoying your time in Florida.


~Joan