Friday, January 6, 2012

{Post #876} Under Sink Project


Even our cabinet floor is happy we are having a makeover...see the stain/smily face??

When I was finishing up the painting of the interior walls last night, my husband came home from a l-o-n-g day of work.  He had just driven over 90 minutes as well.  I pointed out how bad the condition of the side walls was...he changed clothes and went right down to the garage to cut some scraps of wood to recover the walls.  No wonder he is my hero!  He's always thinking of others.

So I painted the walls white last night.  While I was out today, he installed them.  He had to cut them in half to get them in there.  All the pipes, disposal, etc. have made this a cranky job.  As in...I was cranky when working on it!  But somehow I persevered (I'm sure it was only by God's grace).


In the above pic, I'm cutting out a rectangle to fit around one of the above-mentioned pipes.  I just used a paring knife to cut.  These are the cheap 12" self-adhesive floor tiles.  I don't actually adhere them to the base of the cabinet.  That way they are easy to remove and wipe off.  I just trim the paper away from the edges to make it look nice.


Above is the finished product from that little step.


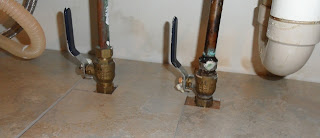
Here is a close-up of the two-pipes-into-the-floor area.  I don't shoot for perfection here.  Just trying to use as few tile pieces as possible.

Here's the whole floor before putting things away.


Finally, with all our former stuff replaced...


Here is the before in case you forgot:


It sure is a lot of work to empty, declutter, clean, and reorganize, but the rewards are worth it!!

~Joan

{Post #875} Bread is Finished...Granola, Too!


The braid is beautiful.  Now we are impatiently waiting for it to cool so we can eat some!


Fortunately, the granola cools much more quickly.  Here are my two youngest girls polishing off one of the two pans.  Have I mentioned that I make 14 cups of this stuff at one time?  I am happy if some of it goes into the pantry for another day.

The caption for this is their response to my saying "Don't eat it all!"  They are thinking, "Isn't that why you made it??"


~Joan

{Post #874} Risen Braid

Yea...the granola is back in the oven for a few minutes.  Here is the risen bread braid.  Notice how big it is on the pan.


Here it was before. 


It is reversed in direction.  Susie just put it in the oven, so baked pictures next.

~Joan


{Post #873} Braided Bread and Project for Today (and Possibly Tomorrow)

OK--so upon further inspection (coming to you via pictures in a minute), this is a bigger job than I had thought.  I am going to paint the inside of the cabinet white (which I did on my upper cabinets and what a world of difference it made).  The first picture looks innocent enough, eh?  I did wipe the doors off AFTER taking the picture when I noticed the stuck-on food and drips.


This next picture is not for the faint-hearted, newly-married, or new homeowner.  Brace yourself.  This is the result of ten people jamming things into a large space.  It's not pretty.  Ready??


Yes...hideous.  I will need to check to see what paints I have available.  This past summer I completely repainted the face of the upper cabinets.  I did not start out intending to.  I used a 1" wide brush to touch up a few areas, and before I knew it, I had painted all the face with said 1" brush.  I can see from the above picture that I need to touch up the cabinet face after I paint the inside walls a nice bright white.  Then I'll put in the floor tiles and replace what will go back in there.  I'm nearly out of dishwasher detergent, so I'll have to mix up another batch of that as well.  'Twould be a shame to actually run out and have to face dishwasher detergent crisis.

Here IS something pretty.  I goofed a couple times, but I finally mastered the 6-strand bread braid.  Doesn't that look wonderful?  It's rising in the oven now, so I'll just stir my baking granola again and head down to see what supplies I need for this little project.


Off again!  BTW, I'm piddling around doing these little things mainly because I already cleaned up the kitchen, have the dishwasher going, mixed bread dough (and braided it!), and have granola baking.  The granola takes at least 90 minutes, sometimes more, so I am here for the long haul.

~Joan

{Post #872} Ornament #2...Liking More!


I have a problem.  OK--I have LOTS of problems.  One recurring one is that I can barely endure just sitting.  I must be doing something all the time.  That leads to trouble sleeping because my brain will not shut off.  I keep scrolling through all the things I want to do the next day.  {Sigh}...it's tough.

Here is my second 2012 ornament.  I like it better than the first.  For those of you who have asked how they're made and are truly interested, I am including details on how this differs from the first.  For those who don't care for the details, look at the pictures and move on!

Here was my first:


The second:


Now for the changes.  After watching the video, I was shocked that the pieces were not pressed ahead of time.  So I decided to give that a try since I hate pressing.  I like the non-pressing method better.  I also used a pin on every point and one in each side of the center folded piece.  Much flatter and round-shaped.  I am going to undo my first one and repin.  I will have to discard a few of the outer pieces because they are mushed with hot glue. 

The layers on #1 are 1/2" apart each.  The second one has the red 1/2" from the center, then the next creams 1/4" out from there.  Since I used a 2-1/2" ball instead of a 3" ball, that worked fine for me.  The edges of the last cream later actually are perfectly flat next to each other, making it easier to wrap a strip of fabric around them (that will NOT be glued).

That brings me to the final change.  For #1, I put wrong sides together of a strip of cream and pressed it flat with the seam on the back side so it would not show after gluing.  The glue oozed out from under the strip, looking bad.  Once cool, it was impossible to remove w/o significant damage to the pieces it touched.  I am going to dissemble that one and use the outermost pieces for the innermost on other ornaments so the damage will be covered by subsequent layers.  For the strip for the new one, I'm just going to iron a strip in thirds, making sure the outermost raw edge is in far enough not to be seen.

I made the executive decision this AM to make red balls for the girls and green balls for the boys.  I will have 4 leftover balls since I started with 12, so I'll make a few others to give as gifts.  These will be a great project for our Sit & Knit group that meets on Tuesday nights.  All I'll have to do to prepare is cut 2-1/2" squares and tote a bazillion pins.

Big projects for today are learning how to make a 6-strand braided bread (and the bread machine just beeped, meaning it's show time), baking granola (it's in the oven), and a little project for under my kitchen sink.  That involves emptying, purging, cleaning, painting, tiling (with adhesive 12" floor tiles that I won't remove the paper from the backs of), then replacing the things we actually use under there.

Here I go.  I'm tired already...

~Joan 

Thursday, January 5, 2012

{Post #871} A Good Lunch


A good lunch is a treat.  And a rarity.  But today is an exception.

I made my whole wheat French rolls, but shaped them into Kaiser rolls.  I watched this video ages ago and have made dinner rolls this way several times, but never with this dough recipe.  Here is the URL for the video:  http://www.youtube.com/watch?v=tU9I1nYS60E&feature=related.  The video is evidently done by a very young man and is shaky, so take your Dramamine and watch it.

Here are my rolls before and after rising...


They're in the oven now, so I'll take a picture when they come out.  Here it is...


Yes, I would love to slather these with butter.  But regularly hearing of folks who are suffering from heart problems, diabetes, etc., makes butter a rare treat.  Even if Jesus ate it (Isaiah 7:15). 

Let's just say I've gotten a whole lot more enthusiasm for lunch today than we usually have.  Who can resist healthy homemade bread?

~Joan

Tuesday, January 3, 2012

{Post #870} 2012 Ornament


As many of you know, I have eight children.  I have purchased or made them an ornament every year.  They all have at least one "baby's first Christmas" ornament. 

Every year I have added one ornament to their personal collections.  The 2011 ones were sleds with greenery and working parts on the sleds. 

I am revealing the 2012 ones here.  Made the first one tonight.  The red fabric will not be the same on every one.  This was a sample to see how easy they were to make.


As with every new craft, I learned a little along the way.  The balls are 2-1/2" across (in diameter).  I am going to attach a button with a thin ribbon through it for hanging later.  The cream fabric looks like it's sponge painted with taupe and glittery gold.  Very pretty in person!

Here is my pattern source.  http://crafterwithoutacat.blogspot.com/2009/08/ornament-tutorial.html.  I made a few changes since the styrofoam balls I used were 2-1/2" in diameter instead of the 3" they recommend.  To make it a tiny bit smaller, I put my red fabrics 3/8" from the center and the next cream ones 1/2" from the reds.  It all matched up nicely on the sides.  I could not find 1/2" long sequin pins, so I used the smallest pins I could find, which were 1-1/16" long.  There was no problem using the longer ones.

~Joan

Monday, January 2, 2012

{Post #869} Supper Tonight

If you would ask "how was supper tonight"?  I'd have to answer GRATE!

Here are some pictures from preparation and my husband's plate at the end.

First I scrubbed some small Russet potatoes for a new recipe, Hasselback Potatoes.  I dried them and set them in the bowl of a large spoon, then made parallel cuts down to the spoon about 1/8" apart.  I spritzed them with canola oil spray and sprinkled a little kosher salt on each of them.  Put them on parchment paper on a baking sheet and baked them for 40 minutes. 


In the meantime...

Take a butternut squash and cut the ends off, then cut it in half down the middle.  Cut off the skin (the skin is tough to get off, BTW).  Remove the seeds and the little bit of soft skin around them.  Grate it into a bowl.


Wash and grate 3 unpeeled sweet potatoes into the same bowl.  Heat a cup of water in a large non-stick skillet over medium heat, then dump in the squash and sweet potatoes.  Saute for about 10 minutes, stirring frequently and adding water as necessary to keep from sticking.

Susie trying a potato right out of the oven.   Hasselback bliss...


My husband added some turnip greens and black-eyed peas to his plate.  Here it is...


My husband just told me that he is at his all-time low weight since starting our new way of eating back on September 17 at 6:22 PM (not that I've been keeping track of when this whole thing started or anything!).  So happy for him.

~Joan