Friday, July 20, 2012

{Post 1,016} Mostly Finished Twister Quilt

My Twister quilt is nearly finished.  I took Ruth's recommendation and tried some caramel-colored Connecting Thread quilting thread...I love it!!  


Looks like I'll be in the car at least 9 hours each on the next two days, so I wanted to get the binding sewn to the front of this so I can hand sew it while I'm riding.  


I started quilting question marks joined in groups of 4 on this, then finished the outer border with invisible thread.  Now to pack for our trip and get my sewing supplies together.  I will finish quilting the center after we get home.


This is 29-1/2" square.  The first few curlicues:


{Post 1,015} Twister Magic

I really like the mini Twister ruler.  As I was cleaning up/decluttering my sewing room, I found a charm pack of 5" squares from who knows where.  Perfect size for a mini Twister quilt.  Last night I laid out the squares and sewed the center together.  This AM I added a complimentary dark cream/caramel border, cut and resewed the squares.  This will be the first new wall quilt for my sewing room.


After cutting but before resewing:


After resewn (21-1/2" square):


Have to go do a few errands, but will border this and hopefully get it quilted when I get home.  Will be in the car for 9 hours tomorrow and 9 hours on Sunday, and hope to be sewing the binding on this by hand while I sit.


~Joan

Thursday, July 19, 2012

{Post 1,014} The Unveiling

I know some of you could barely sleep night just wondering how my sewing room turned out.  


Susie got home late last night (just as I was about to keel over from fatigue), and we moved all the furniture around.  That girl is a mover and a shaker.  The problem with moving a lot of stuff in a small room is that you have to keep moving stuff to make way for moving stuff...especially if said stuff is large...very large...like a quilt frame large.


This afternoon my husband had other ideas about the room set-up, and that resulted in moving same said stuff around.  Fortunately, I had gone through the remnants and discarded some and boxed up a large amount for a local quilt guild and discarded some more.  I was very pleased with the turnout.


I am thinking I need a wall of small quilts like I've seen on some blogs.  I do have two puzzles framed on the walls that are quilt-related.  See if you notice them in the pictures.


There is so much I like about this set-up.  There are several boxes in the pictures that are going away.  The room didn't get in disarray in one day, and it won't be perfect in one day...if ever!!  I like having my sewing machine table sort of anchored against the wall.  I put the ironing board there to make in convenient.  See the jumper on my sewing machine table (last pic)?  I altered the jumper (had to take it in significantly (whoo-hoo) and take 6" off the hem.  Did that then started laying out a charm pack of 5" squares I came across (from only God knows where) on my design wall to use my Twister ruler on.  Got those all sewn together and sewn into a top for cutting in the AM.

Speaking of cutting, did you notice how neat and clean my cutting table is?  You can see it in pictures 1 and 3.  There is a stack of books we used for school on the left side of the table, awaiting a Chick-fil-A fry box to store them away until my grandchildren want to read them.

Sooooo happy with my new set-up.  Even test drove the DVD player (which is neatly tucked against the wall by the window until needed) by watching a few minutes of "Pride and Prejudice".  Mr. Darcy is still proud.  Or is he prejudiced?  Lovely set up, no matter!

~Joan :)


Wednesday, July 18, 2012

{Post 1,013} Attempting the (Nearly) Impossible

I am baring my soul (well, my sewing room) to you.  It has gotten messier and messier.  I have finally decided to dive in and do something about it.  Today I worked about 5 hours on it.  Don't see a marked improvement (yet!), but I am happy with what has been accomplished. 


I had worked about two hours when my sweet sister-I-was-separated-from-at-birth emailed me about "before" pictures.  All I had done to that point was go through two huge storage boxes that are now EMPTY (a rare sight around here), so not much has been touched on the cutting table or shelves.  


I hope some of you have done this same thing.  Dejunking is so time-consuming for me.  Having to decide what to keep, gift, dump...all those decisions!  Add in running across project after UFO after lost yardage, ad nauseum.  Surely some of you know what I mean?


The two aforementioned boxes were in my bedroom for ages.  Then in a bedroom-cleaning frenzy, they were moved to the garage.  They were mostly fabric chunks, quilt tops, and other crafting stuff that had sneaked into my bedroom. Unfortunately, a leak a good while ago in the room over the garage mostly landed in my boxes.  I forgot about it though because only my daughter parks her car in the garage.  Out of sight, out of mind?


I had to wash all the fabric in the boxes (as well as a quilt top that I was just wondering last night where it was).  The quilt top has several squares that need to be replaced.  They are stained.  I washed it on a gentle cycle.  There was a tiny bit of fraying, but not much.  I will replace those squares soon.  You can see it hanging across my quilt frame in some of my "before" pictures.


The perfectionist in my wants to head right back down there and "finish this thing for goodness' sake!".  But I am afraid I will burn out.  Five hours of facing that mess is enough for today.  I am going to go down and sew for about an hour after I finish here.


I listed some of the fabric chunks I washed and dried today on my Etsy store.  My store name is ShelbyStitcher.  I am charging $5 a yard for the fabrics.  I threw away two large trash bags of...um...stuff.  Don't want to think about it.  Also have a large bag to take to Goodwill.  I will press on (little quilting pun there).


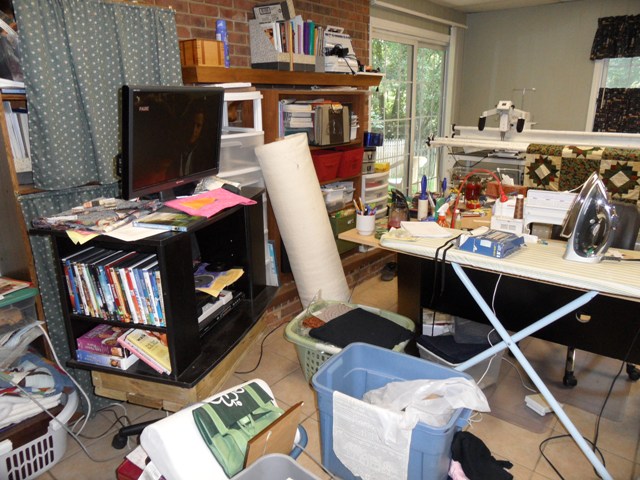
Are you ready?  Forewarned is forearmed:


Yes, it is as bad as it looks.  Maybe worse!  


Above is two of my storage areas.  I cleaned off the top shelf of the brown bookshelves.  I also went through all the drawers that are mine in the plastic shelves on the right.  Two of them are my daughter's things.  I made a list of the quilt tops in there and what stage they are in (need piecing, borders, quilting, etc.).  I make so many quilt tops with no recipient in mind that many of them languish for a long time.  The brown shelves have the green curtains across the front most of the time.  The bottom section is my I Spy stash.  The shelf above it is fabrics I've saved for borders (mostly Thimbleberries).  Above that is my books, and the top shelf will be the new home for my recycled shirt chunks.


This is the neatest wall.  It has my two fabric bookshelves, two portable design walls, and a school bookshelf on it.  This just needs some minor straightening.


My cutting table...a cutter's nightmare.  The shirt projects are spiraling out of control.  In the back left (under the wire basket and piece of leftover batting) is my pile of shirt front and backs.  They are large pieces, neatly folded.  My original idea was to cut pieces for several quilts as I cut the shirts apart.  As it turns out, I've had my hands full whittling down the strings generated from just deboning the shirts.  All is well, though.  I did complete a Fair & Square and Scrappy Bargello quilt, not to mention several baby quilts.  Others in the works, but I need to clear off my cutting table and make a shirt section in my storage nightmare!

Let the sympathy or congratulations begin!  I have a doctor's appointment in about an hour, so I'm going to go sew until I have to leave.  I only wanted to declutter for an hour today, and I did 5 times that, so I deserve a few minutes' break.

~Joan


Tuesday, July 17, 2012

{Post 1,012} Northern Comfort Center Finished

Here is the center of my Northern Comfort.  I will add the two borders soon.  I think a complete cleaning and reorganizing of my sewing room is on the horizon (and I shudder in fear).  I will add the borders for this and then decide if I'm going to keep it, gift it, or sell it.


It measures 49" x 64.5" now.  I added more rows than the original quilt pattern called for.


{Post 1,011} Simpler Maple Leaves

This post will have one picture.  I was asked by several ladies to explain how I simplified the maple leaf quilt blocks in my last post.  My block finished at 3-1/2" square.  Here is a crude drawing I made to help show the difference.  The top half of the picture is what I was told to sew.  I did three blocks that way and was frustrated because of the many lumpy seams.  I nearly stopped working on the project altogether.  If you look at my picture, they were the three brown blocks.  The bottom half of the picture is what I ended up doing!


Each of the 3 rows in the block had 3 squares originally.  All orientations are from left to right.  


The top row from left to right are:


HST, HST, cream square


Middle row is:  


colored square, colored square, HST


Bottom row is:


Stem, colored square, HST

My "squares" (set 3 x 3) all started as 1-1/2" (unfinished size).  For the top row, I had to piece the 2 HSTs.  For the middle row, instead of sewing two squares to a HST, I just used the flip and sew method of making a HST but instead of making a HST I measured the correct length of the whole unit with a cream triangle at the end.  For the bottom row, I shortened the length because the stem unit was on the far left.


Hmmm...I am nearly confused myself.  I will just give you the measurements I used and can answer any questions you may have.  I cut a 1-1/2" x 9" cream strip.  I cut it into six 1-1/2" squares.  I also cut a 1-1/2" x 9" colored strip.  That I cut into a 3-1/2" piece, a 2-1/2" piece, and two 1-1/2" squares.


If you are using rickrack (which is easy AND so cute), lay that down the center of as many stem units as you will need.  Sew them down the center with matching thread.  I found it easier to just sew them all on at once then snip them apart.  


These are instructions for one block.  Sew the two 1-1/2" colored squares and two 1-1/2" cream squares together (one of each color) on the diagonal.  Trim 1/4" away from the seam and press open.  For the center row, add a cream square to the 3-1/2" colored piece, sewing diagonally, then trim and press open.  Be careful that you sew it the right direction.  You want the cream triangle to be on the right end, on the bottom corner.  Repeat with the 2-1/2" colored strip and another 1-1/2" cream square for the bottom row, having the cream triangle in the same orientation.  


Add the stem to the solid end of the 2-1/2" unit.  Sew the two HSTs together for the top row with the cream in the top left corner and a solid 1-1/2" cream on the right end.  


This truly is easier, creating less bulk because of having fewer seams.  Once you do one, you will see.  Please feel free to ask any questions.  If I were constructing another, I'd take pictures.


~Joan


Monday, July 16, 2012

{Post 1,010} Fall Table Runner

I pieced this last night and this morning.  I was going to list it in my Etsy store, but I thought my Emily might want it.  The leaf blocks are 3" square...the stems are dark brown rickrack.  It measures 20-1/4" wide by 28-1/2" long.  All Thimbleberries except for the border !!


A close-up of a couple leaves and the border.  I changed the leaf pattern and eliminated a few seams.  Made it easier and faster to piece and less lumps in the final leaf!


Waiting for Emily's reply (no pressure, Sweetie, I don't mind selling it!).


~Joan

{Post 1,009} GFG Hand Quilting Beginning

This AM I had to take Rachel to the orthodontist.  What a sacrifice!  I wanted to get a couple rows quilted on my Grandmother's Flower Garden wall hanging to see if I really liked my thread and design choice.  


My hexagons are 1" on each side (finished), and the rows of quilting are 7/8" apart.  Here are pictures with flash and without.  I did 1-1/2 rows the opposite direction of the others so I could get a sample of the "grid" pattern that will run diagonally across the quilt.


I toyed with the idea of quilting inside each hexagon 1/4" to accentuate the hexagons, but I like the way Natasha's quilt looked after it was quilted.  That purple flower is such a lovely hue with the green background, don't you think?

~Joan, who is off to photograph a new project started yesterday


I