Showing posts with label ornaments. Show all posts

Tuesday, December 1, 2015

{Post 1,506} Tumblers Away

Got up to 8 rows in a hurry.  I have lots of these cut out.  I wanted to get to this point because I had a partial section of 4 short rows to add.


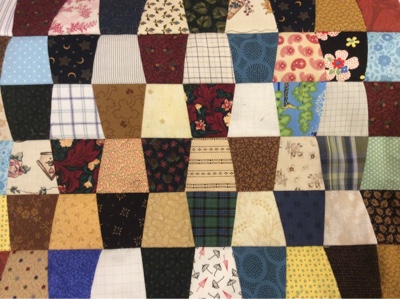
The section below is 16" wide by 90" long.  I am, really liking this.  This is 480 tumblers!


The following pictures are ornaments I have for auction on eBay.  My user name is whistlersmother10.  I thought the selvage ones would be especially cute for a quilting friend or a guild meeting.  The back fabrics are plain, so one could personalize them for gift tags or ornaments.


I got so much done today in my stitch den.  I cleared out a whole large drawer, tamed most of my shirts, and nearly got my cutting table cleaned off of things that have been marinating there for some time.  Whew--I feel good.


Thursday, November 19, 2015

{Post 1,502} Ornaments for Grandchildren


These are 5" by 2-1/4". They didn't turn out as professional looking as I had hoped, but they are TINY places to paint.  I ended up using my label maker to put the sentiment on the back.  It is teeny tiny.

I painted them cream so they would show up on the tree.  I got them at Hobby Lobby.  I already have some ideas for the next couple of years.

Saturday, October 11, 2014

{Post 1,440} And Then There Were Two

I finished the center of another ornament tonight.  As much as I hate paper piecing, one does get some fabulous little pointy pieces!


These finish at 3-1/2" square.  I am very pleased with these so far.  My 15-year-old son already claimed the one on the left.  He thinks it looks like Captain America's symbol.  *sigh*  The comic influence!

Tuesday, October 7, 2014

{Post 1,437} One Down, Seven To Go


I have made my eight children Christmas ornaments for many years.  I don't remember when I started, but then I don't remember most things.


When we were at the quilt show last weekend, my husband asked what I was doing for the kids' ornaments this year.  I told him I had purchased some laser-cut wooden stars.  I was going to paint them with glitter gold paint and be finished with it.  He inferred that that wasn't bringing my "A" game.  Soon thereafter we saw some paper-pieced ornament patterns at the show.  They finish 3-1/2" square.  

I made this one tonight.  I did a single-fold binding, and I love the way it looks.  I hand-sewed the ends of the binding together, as getting such a small piece under my sewing machine foot would've taken a miracle.


I will attach a jute hanger with a couple small upcycled shirt buttons.

Monday, November 18, 2013

{Post 1,284} Christmas Ornaments


Here are some ornaments I made tonight to sell at a Christian bookstore in town.  I am making 20 of them.  Mostly finished!

Friday, November 8, 2013

{Post 1,281} A Little of This...

...and a little of that...and a teeny tiny bit of something else.


This is the sewing I've been up to the past couple of days.  

I found a few bags of odd-sized HSTs amongst my sewing supplies.  I had seen the top quilt in a picture of mini quilts.  Yes--I am still making some for my sewing room wall.  Will they ever be hung is the question.  Since I had all the HSTs already sewn, that mini quilt was sewn up in a jiffy.  It will eventually have a small border.

Pinterest is to blame for the next two blocks.  A slew of my HSTs were 2-1/4" square...then I happened upon a large stack of ones that were 2-1/2" square, so I trimmed them down to add to the mix.

The last teeny tiny quilt is a tree ornament that measures 2-1/2" square (notice how large the thread looks).  I made a set of 3 for a friend for Christmas (all in different purples--her favorite color) and am wondering what to add for a hanger.  They are paper pieced.

Now I'm going to pin sets of 22 HSTs together to see how many blocks I can make with what I have already of the second quilt down.  How would you set these very pointy blocks?  I don't want to set them side by side as the points will touch each other and add even more thickness to a block that is already loaded with crowded intersections.  All ideas welcome.  I have one, naturally, but want to see what you all suggest.


Saturday, December 22, 2012

{Post 1,101} Quilt Ornament


Did a few everyday things this AM, then wanted to sew so badly (even if it was just for a few minutes!).  This is the result...all from scraps of fabric and batting on my cutting table.  It is 3-1/2" square.


Inspired by Ruth, who made some of these herself and showed them on her wonderful blog.

Saturday, September 29, 2012

{Post 1,062} Christmas Ornaments


Here is a little idea I sorta copied from two pictures I have seen put together.  They are made from selvages, then used a pinked blade rotary cutter for trimming:


They will eventually all have trunks.  I ran out of steam.  Just can't get motivated today.  I made the two green with horizontal pieces first, then tried some diagonal greens, then made 8 of the diagonal cream, thinking they would show best against green branches on a tree.  I am going to make a short jute hanger and attach it with a button at the top.  I will probably list these on eBay or Etsy down the road.

So tired.

~Joan


Wednesday, January 11, 2012

{Post #879} Four Ornaments

So, which of these is your favorite and why?


The bottom right one is the first I made.  the top left was the second.  I like each one I make more than the last.  I have asked my kids which ones they like.  So far I have two votes for top right, one for bottom right, and one for bottom left.  Four more kids to ask.


These don't all have their outside strip on yet.  Just sayin'...


Oddly enough (or not), my husband and I both like the same one the most.


~Joan

Friday, January 6, 2012

{Post #872} Ornament #2...Liking More!


I have a problem.  OK--I have LOTS of problems.  One recurring one is that I can barely endure just sitting.  I must be doing something all the time.  That leads to trouble sleeping because my brain will not shut off.  I keep scrolling through all the things I want to do the next day.  {Sigh}...it's tough.

Here is my second 2012 ornament.  I like it better than the first.  For those of you who have asked how they're made and are truly interested, I am including details on how this differs from the first.  For those who don't care for the details, look at the pictures and move on!

Here was my first:


The second:


Now for the changes.  After watching the video, I was shocked that the pieces were not pressed ahead of time.  So I decided to give that a try since I hate pressing.  I like the non-pressing method better.  I also used a pin on every point and one in each side of the center folded piece.  Much flatter and round-shaped.  I am going to undo my first one and repin.  I will have to discard a few of the outer pieces because they are mushed with hot glue. 

The layers on #1 are 1/2" apart each.  The second one has the red 1/2" from the center, then the next creams 1/4" out from there.  Since I used a 2-1/2" ball instead of a 3" ball, that worked fine for me.  The edges of the last cream later actually are perfectly flat next to each other, making it easier to wrap a strip of fabric around them (that will NOT be glued).

That brings me to the final change.  For #1, I put wrong sides together of a strip of cream and pressed it flat with the seam on the back side so it would not show after gluing.  The glue oozed out from under the strip, looking bad.  Once cool, it was impossible to remove w/o significant damage to the pieces it touched.  I am going to dissemble that one and use the outermost pieces for the innermost on other ornaments so the damage will be covered by subsequent layers.  For the strip for the new one, I'm just going to iron a strip in thirds, making sure the outermost raw edge is in far enough not to be seen.

I made the executive decision this AM to make red balls for the girls and green balls for the boys.  I will have 4 leftover balls since I started with 12, so I'll make a few others to give as gifts.  These will be a great project for our Sit & Knit group that meets on Tuesday nights.  All I'll have to do to prepare is cut 2-1/2" squares and tote a bazillion pins.

Big projects for today are learning how to make a 6-strand braided bread (and the bread machine just beeped, meaning it's show time), baking granola (it's in the oven), and a little project for under my kitchen sink.  That involves emptying, purging, cleaning, painting, tiling (with adhesive 12" floor tiles that I won't remove the paper from the backs of), then replacing the things we actually use under there.

Here I go.  I'm tired already...

~Joan 

Tuesday, January 3, 2012

{Post #870} 2012 Ornament


As many of you know, I have eight children.  I have purchased or made them an ornament every year.  They all have at least one "baby's first Christmas" ornament. 

Every year I have added one ornament to their personal collections.  The 2011 ones were sleds with greenery and working parts on the sleds. 

I am revealing the 2012 ones here.  Made the first one tonight.  The red fabric will not be the same on every one.  This was a sample to see how easy they were to make.


As with every new craft, I learned a little along the way.  The balls are 2-1/2" across (in diameter).  I am going to attach a button with a thin ribbon through it for hanging later.  The cream fabric looks like it's sponge painted with taupe and glittery gold.  Very pretty in person!

Here is my pattern source.  http://crafterwithoutacat.blogspot.com/2009/08/ornament-tutorial.html.  I made a few changes since the styrofoam balls I used were 2-1/2" in diameter instead of the 3" they recommend.  To make it a tiny bit smaller, I put my red fabrics 3/8" from the center and the next cream ones 1/2" from the reds.  It all matched up nicely on the sides.  I could not find 1/2" long sequin pins, so I used the smallest pins I could find, which were 1-1/16" long.  There was no problem using the longer ones.

~Joan