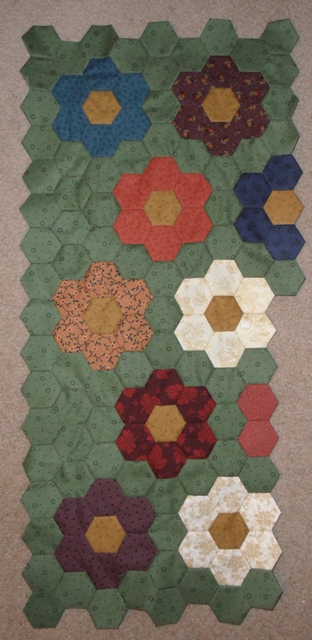
Monday, July 21, 2014
{Post 1,380} GFG Progress
Thursday, May 8, 2014
{Post 1,352} In NY for a Wedding!
Wednesday, March 12, 2014
{Post 1,334} She's Still Alive!
Monday, March 3, 2014
{Post 1,332} Weekend Trip
Friday, August 16, 2013
{Post 1,238} Lady in Waiting
Yesterday I was out and unexpectedly had 2-1/2 hours on my hands. There was a mix-up as to when I needed to pick up some folks at the airport, and I ended up realizing there had been a mistake after waiting an hour at the airport. The time sort of flew because I was reading an interesting book on my Kindle. Going home would have been a huge waste of time. What's a girl to do?
Fortunately, I still had my "lady-in-waiting" bag in my purse from my recent FL trip. This phrase is one I got from my friend, Janet, at the Rogue Quilter blog. I was able to make 2 whole more hexagons and attach them to the mother ship.
First picture shows a PIECED center hexagon (I didn't have one fabric big enough, but I couldn't let that little detail stop me from making progress). Second picture is the progress so far on this project. I have a bobbin in the top left hexagon to show scale.
Wednesday, August 14, 2013
{Post 1,237} Queen-Sized GFG So Far
This shows the meager beginnings of my queen-sized Grandmother's Flower Garden. I just realized I will want to put half-blocks all around the edge. I propped a piece of white paper on the pins holding the block up so I could see how it would look. That will work! I will need many more blocks before this becomes a reality. No timetable, so I'm good!
{Post 1,236} Some Sewing on the Trip
With so many hours in the car (and a few minutes in the house when everyone was gone or whatever), I did some hand sewing on this trip to Florida over the weekend. My husband and I celebrated our 25th anniversary on 8/13, and my daughter was celebrating her 2nd on the same day.
Here is what I accomplished...NEARLY completing FOUR Grandmother's Flower Garden blocks. I also basted a lot of the green diamonds that go between the blocks. I arranged the ones in the second picture so one could see where the diamonds will go once the final layout is determined.
Since these pictures, I completed all four out to the cream rings.
Friday, May 17, 2013
{Post 1,178} New Hexie Project
This is my new hexagon project (handwork for traveling and waiting places). I wasn't going to start one of these, but I like the handwork for keeping busy on the road. We've been traveling a lot lately, but it does come in spurts.
I saw a hexagon project lately where some of the blossoms were fussy cut. I don't have a lot of fabrics with which I can do that, but there are a few. So I am embarking on a queen-sized hand made (cut, sewn, quilted) quilt so I can sleep under it a few times before my kids put me in a nursing home. Thinking l-o-n-g term here!
Yesterday the mailman brought me the little diamond pieces. Whew--they are tiny. When I first saw them, I assumed they were the wrong size, but no--perfect fit! They are one-inch long on one side. The hexagons are also one-inch long per side.
My plan for now is to sew a blossom all the way out to the cream ring then join it to the mother ship. We'll see how that goes.
In the picture, the green diamonds are not sewn onto the blossom. I just wanted to show how it would look (sorta) when they would be. I am making the greens scrappy.
Monday, September 17, 2012
{Post 1,056} Green Hexagons
Here is a little runner I whipped up tonight. The "try this new technique" bug bit after I saw the cover quilt on the newest Quilt Sampler. Since I just hand-pieced a hexagon quilt, I was interested to see "how" it was done by machine.
As I perused the magazine, I saw that the template for the hexagon measured 6" across!!!!! I use such small pieces (often finished 1" squares or 1-1/2" HST) that those looked like dinner plates to me! I still wanted to give it a whirl, but didn't want to cut out the hexagons.
Way back when I first started selling on eBay I made an acquaintance with a man who was making plexiglass extension tables for sewing machines to enlarge the machine quilting area. He got a lot of info from me as we emailed back and forth. I suggested that since he had the tools for cutting the lucite/plexiglass stuff that he make some quilting templates. So, to make a long story short if it isn't too late already, he made me a couple sets of hexagons and accompanying triangles for I spy type quilts.
I looked in my I spy stash drawer, and lo, and behold, there they were!! I had a gigantic one and the one I used for the runner, which measures 4" from flat side to flat side.
Monday, July 23, 2012
{Post 1,017} Twister Quilt Finished GFG Update
Here is the finished Twister quilt from my sewing chair:
Saturday, July 14, 2012
{Post 1,007} Grandmother's Flower Garden Sorta Finished
My Grandmother's Flower Garden wall hanging...finished? Sorta--meaning the hand piecing is finished. This was nearly finished for so long. Don't know why it got put on the back burner so to speak. I hope to get the borders sewn on this AM. I think I will do a couple. Maybe a thin one then a wider? Hmmm...
We are taking a l-o-n-g car trip next weekend, so it will be nice to have something to be hand quilting on the journey. More incentive to get this bordered and basted, yes??
~Joan
Saturday, February 18, 2012
{Post #915} Hexagons
Friday, February 3, 2012
{Post #897} GFG Progress and Selvages
I took my Grandmother's Flower Garden wall hanging to work on this AM while Rachel sold food at the flea market. I got quite a bit finished because I also took it to the eye doc's waiting room while Isaac had an appointment yesterday. All I did yesterday was baste hexagons to add later (which ended up being today). Here' tis...
In other quilty news, I also trimmed off these selvages last night. Wednesday night is a church service for us. Mary Jo's is 15 minutes past our church. I drop our children off early for youth choir, so I often head over to the city for an errand. I picked up a few scraps and FQs for future block of the month quilts. I harvested these selvages for future Red Zinger blocks.
I will be working on those in the coming weeks. I even got some off of the scraps Julie sent me for my February "Count On It" block. BONUS!!
~JoanG
Thursday, January 26, 2012
{Post #891} GFG Repaired and Enlarged
One thing I've come to realize when I'm making a craft: As soon as I realize I don't like something, take the time to undo it, and then go on.
For example, it really bothered me that I ignored my color plan and ended up with the two cream flowers side by side. Some people would say, "Oh well--who's going to notice?" *I* am going to notice...it's MY quilt! So, yeah, I ripped out the cream flower and put the one that was supposed to be there. Not sure I like the periwinkle flower because it stands out so much. I hope once the garden is complete it will look like it fits there.
This piece measures 28" from top to bottom.
Here is the before and the now (after)...
{Post #890} GFG
So here is my Grandmother's Flower Garden progress. I cannot take the mistake I made of ignoring my color layout and placing two cream flowers next to each other (I mean--what in the world?), so I will be removing the bottom one and replacing it with the flower that I originally planned to be there.
We are replanting the flower bed areas outside the front edge of our house...hopefully this year! I am eager to plant lots of lovely blossoms out there. White and orange and red and purple...just like my GFG...but I am not a grandmother...YET! I am not dropping any hints or news--just making an observation.
~Joan
Saturday, January 21, 2012
{Post #885} Lunch Box
I don't think this is really a lunch box. It was given to my daughter, Elisabeth, about 8-9 years ago as a secret sister gift. She has since given it to me. I am using it as a portable project holder for the Grandmother's Flower Garden pieces.
Friday, January 20, 2012
{Post #884} Added More Flowers
I had two completed blossoms in my "lunch box" (which I'll show later) for this quilt, so I watched another movie and stitched some more. The orangish red one and the white one were already put together, so that made the addition very quick.
You can see a little more of how the finished quilt is laid out now. I am going to cut across the outer edges and add a border or two once the piecing is finished.
This is the full length of the quilt. The top row will be 5 blossoms across to give you an idea of the finished size.
Oy--I feel awful.
~Joan
{Post #883} Hexie Update
Saving these pictures was an eye-opener. These are only the 2nd and 3rd quilt pictures I have saved this entire year. I knew I hadn't been sewing much, but I didn't realize it had been this little.
Anywho...I went to the flea market with Rachel this AM and got to do a little hand sewing. This is the progress on my hexagon project, from the front and from the back.
Saturday, October 15, 2011
{Post #833} Hexagon Help
Here is my not-so-professional tutorial on how I am sewing my hexagons to each other. I have never done a tutorial before, so bear with me. I loaded all the pictures first. Glance at all of them then read and follow along.
I start with knot which was wrapped around six times. This picture shows how I put the hexagons nearly flat next to each other and pick up a few threads.
The last picture above shows from the right side. You can see that you CANNOT see the thread on this hexagon that I just added.
If this is not clear, let me know, and I'll try it again.
~Joan
Friday, October 14, 2011
{Post #832} Hexagon Trial and Error
All three of my kids in braces had orthodontist appointments this AM...that makes me :) because I get to hand sew while I'm in the waiting room. Those ladies always wonder why I'm so pleasant when I'm there ;)
I tried a new technique for sewing the hexagons together. It is a tad slower than just putting them face-to-face and whip stitching them, but the threads do not show on the outside (see the last picture above--greens are sewn the new way, blossom parts the old). I saw on the 'net recently where a woman irons her templates after she pulls them out. I'll give that a whirl when I get near the ironing board again. Instead of putting the hexagons with right sides together, I just held it flat in place and took smaller stitches. I might try to get a photo of that later, but it's working!! I have read several bloggers' explanations of how they sew their hexies together, and I have never come across one that does it "my" way. They must have more success with their stitches not showing.
I ran out of hexagons that were pre-basted. You can see in the top picture that I need to add a couple green hexies before I have a finished horizontal "row". I will add my already sewn together red and cream flowers, then try adding a row at a time. With my new method, I think that will be much faster and economical with time and sanity. Could use more of both.
The possibility of a bed-sized Grandmother's Flower Garden is still out there, but it might take forever. Seeing that Bonnie Hunter admitted to working on her hexagon project for 12 years does make forever seem a little shorter.
~Joan